|
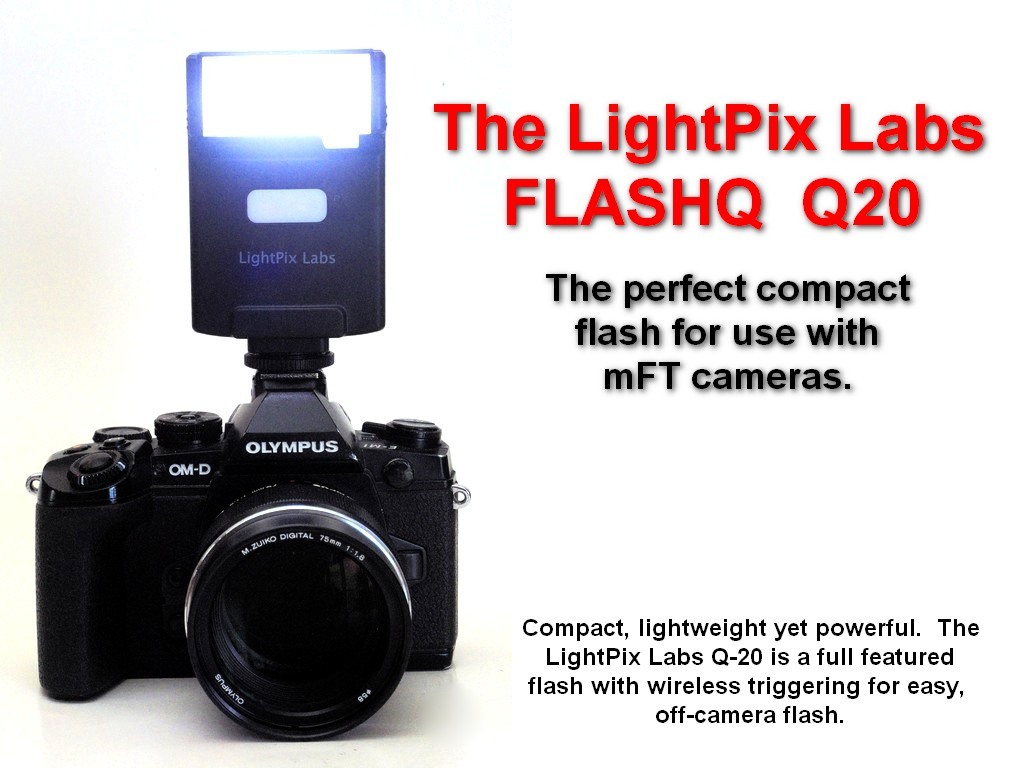
FlashQ's new
Q20 flash with wireless trigger.
For
the last twenty years, Ted Grant (who the US magazine, Photographer's
Forum has called "Canada's greatest living photographer") has drilled
into me, that "if you
an see it, you can shoot it"
and that there is little need for "twinkie lights" as he calls
them. So, I'm a bit of a flash
skeptic. For a flash to
impress me, it has
to be good! And the Q20 is!
Now, I do own a flash ... a perfectly good, Vivitar 283. When it was
first sold, in 1970, (my
unit is from about 1985)
it quickly became the favourite of pros and advanced amateurs alike,
and outsold all other flash units of it's day, combined. It had a
manufacturing run that lasted over 30
years and was twice brought back into production, after being discontinued, because of customer demand!
The problem is that it's big and heavy and although a "thoroughly
modern Millie" in its day, it lacks many of the modern
features, like a
modeling light and, more importantly, variable flash power.
Having abandoned my Leicas, in favour of Olympus mFT bodies (and now
being somewhat older), I wanted something that did not weigh half as
much as my camera.
(My EM-1 Mk II comes in at 1022 grams, with battery, wrist strap and
Oly's 12~40/2.8 PRO zoom. The 283, with batteries,
tips the
scales at almost half of that, at 458 grams... all by itself!)
Any new flash had to be small and lightweight, for travel (I've shot images in some 29
countries, and don't plan to stop any time soon)
and have a tiltable head for bounce flash. The
thought that
it could have a wireless trigger built-in, is a bonus beyond my wildest
expectations.
So, when the opportuntity came up to test Lightpix
Lab's new (introduced in early May, 2017)
Q-20, I
jumped at the chance.
Lightpix Lab's first
product was the FlashQ T1
... a set of tiny (some
say the world's
smallest), yet high quality and easy to use radio
triggers, that allow you to use almost any* flash, off camera. (*Be sure to read the important note at the end of this review)
Unlike
optical triggering (used
by Olympus, among others), radio triggers need not be
line-of-sight, so you can
position your flash unit(s) anywhere within about 30 feet (10 meters)
of the camera.
LightPix's goal, it seems, was to create a small,
lightweight, yet low cost portable flash with almost every modern
conveniences and
include the radio trigger technology from the FlashQ's, too boot!
That's a tall order, but in the Q20, LightPix Labs seems to have done
the job - and incredibly well, at that. |
 |
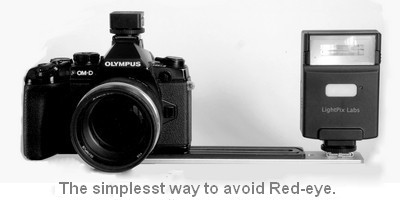 |
Why
use off-camera flash?
Everyone knows
the problems with direct flash... harsh shadows, stark lighting and,of
course, the dreaded "red eye". These problems can be reduced
by
using diffusers, angling the flash upwards (or, better yet, both) and,
in the case of red-eye, using multiple pre-flashes to cause your
subject's
iris to close. These methods can help, but simply using the
flash
away from the camera becomes a quick and total cure for red-eye.
Using your flash off-camera allows you to do things like
high-light hair, even in daytime shots among a host of other
effects.
|
(If
you really want to learn more about off-camera flash, I recommend you
read the tutorials at:
http://strobist.blogspot.ca
/2006/03/lighting-101.html. David Hobby is the
acknkowedged master of flash-lighting, though I don't always agree with
his choice of gear.)
Design and Build Quality
The Q20 is as
nicely made as any flash I've seen. Fit and finish is good,
and
the unit is remarkably attractive - especially from the back; which is
the bit you, as the photographer, see.
Controls:
There
are only
what's needed. An on/off switch, Modeling light intensity
(up/down) and flash intensity (up/down) and a manual flash
button. The only other control is a small pushbutton, just
below
the on/off switch, which controls whether the unit is in flash mode,
modeling/movie light mode or Optical Slave mode. There are
two
O/S modes, and we'll get to them, later.
Oh... and a button at the bottom, marked "Push Release".
Operation:
When
you first turn the unit on, the LED's do a little dance, as it
goes though a short self-test. Then, it settles down to work.
I rather like the "flash-ready" light. It flashes
orange,
while the capacitor is charging. When the unit will fire, but is not
yet at full power, it glows a steady orange. When
the flash
will fire at full selected power, the light changes to green.
To
use it as an ordinary, on camera flash, simply slip it into the flash
shoe, gently tighten the knurled lock ring, turn it on and shoot.
To determine your
f-stop just divide the guide number (20 in meters, 65 in
feet) by the distance from the flash to your subject.
|
 |
That
gives you the f-stop
to
set. If you go closer, or if the subject is more reflective
than you expected,
the sensor will pick up both the ambient and reflected light
and turn off the flash at
the correct time, so that your exposure is correct, without much fuss.
So, don't think of it as "manual flash", but rather as
"semi-automatic" flash.
(I'm
old enough to remember "manual flash" and it was a real pain in the
potoot! Using a flash with an automatic light sensor, as with
the
Q20, is a "piece of cake"!)
This
is the same as any automatic, non-TTL flash and the system has proved
eminently
satisfactory for decades. True, TTL metering
is more
accurate, but only marginally so, and at great cost.... 5 or more times
the cost of a Q20! So, if you're a
pro, and use flash extensively, then fine, go TTL. But, for most of us,
a
standard, non-TTL flash will be more than satisfactory, in nearly every
situation, at far less expense.
 |
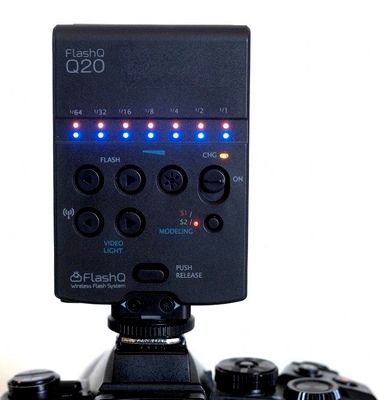
Light
Control:
The flash level is easily adjusted with two buttons (see photo above)
from full power down to 1/64th power, in 7 steps.
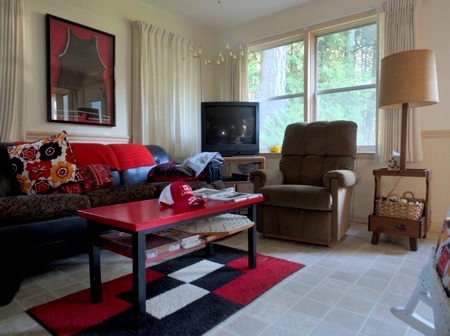
The
shot at the left is our cousin's summer beach cottage, in the eastern
US. 1/32nd power
proved perfect to soften the shadows and lighten any dark corners,
while retaining the look of daylight coming through
the windows. In this shot, the flash was about 1 meter (3.3
feet)
to my left, just sitting on a small table.
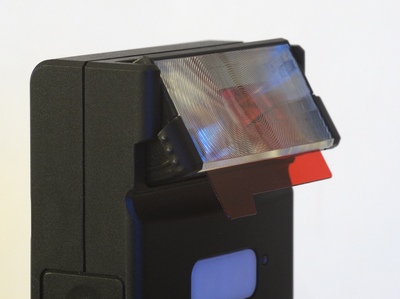
Gel
Slot:
Since
the (original) Vivitar 285 there been exceedingly few flashes
with
an integrated gel holder.
(The LumaPro 180 is one, but it's much bigger, heavier
and nearly
twice the price - not to mention no wireless triggering.)
There are, of course, a myriad of acessory gel
holders for various lighting items.
|
|
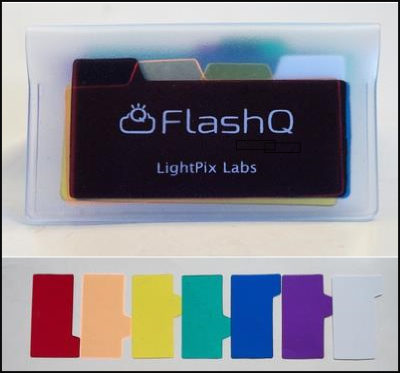
The
Q20 comes complete with a neat, trans-
contains 6
coloured gels and a white diffuser.
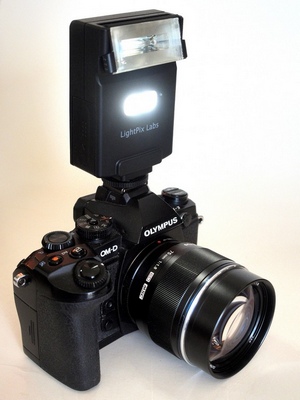
Camera
shown is the Olympus OM-D EM-1 Mk 1.
All photos taken with the OM-D EM-1 MkII.
|
lucent
holder, which These gels fit into a slot behind
fresnel
lens. (shown at the left.)
The most useful one, for me, is the translucent white diffuser, which
helps to soften the light, even when bounced. But, if you like
to "create" your photos, then they may well prove invaluable.
Bounce
Flash:
The Q20's head swivels, for bounce flash, with stops at 45,
60, 75 & 90 degrees.
|
 |
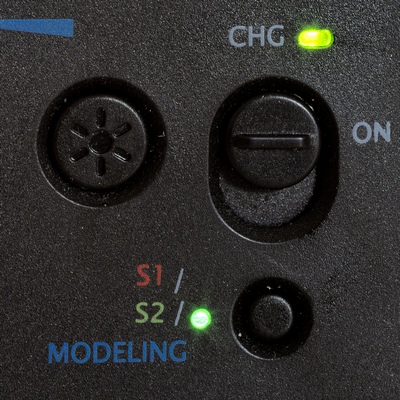
Modeling light:
The
front of the unit has a modeling/movie light
that is fully adjustable, in 7 steps, like the flash power. (See image, below, left.)
I can't
tell you how well it works for movies, as I never shoot video.
But, it is very useful in predicting how shadows will fall
on your subject - especially so in close-up and macro work.
When triggered wirelessly (the
modeling mode does not work with optical slave system - see below)
the
modeling light turns off an instant before the flash fires and
comes back on when the ready
light comes on, again. A
really nice addition.
The
Wireless Trigger:
This is what sets the Q20 apart from virtually every other small flash
in existence. Like all radio triggers, you have to
set
the two sender &
recevier to "talk" to each other, but this is bog simple.
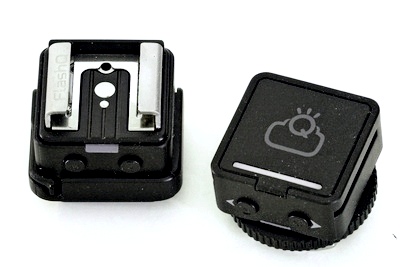
For off camera flash, just press the "flash release" button (arrow) and
the Q20 separates from the base/trigger. You'll note that the
trigger has two small buttons ... one with a dot in the middle (power)
and on with a star [*] which is your test-flash button. Hold the power
button for three seconds and the unit will turn on, signalling this
with a one second burst of a Red/Green/Blue sequence on the LED.
To Sync the units, press and hold both buttons on the transmitter, for
3 seconds. This puts the unit into Sync mode, and the LED
flashes in Blue.
Now, hold the left video light button (marked with a radio-beacon
symbol) down for 3 seconds, and the flash goes into Sync
mode.
The two halves of the row of blue LEDs that normally
show modeling light power will now flash alternately, indicating the
flash is in communication with the sender.
In a few seconds
this will stop, indicating success. All that remains is to
briefly press the power button on the sender, once, to take it out of
sync mode and put it in flash mode.
Trust me, it takes far less time to do, than it does to tell you how to
do it! |
 |
(If you are setting up the
FlashQ T1 or T1-S triggers, the process is almost identical.
And you can mix them with the Q20 to use your old flash in
conjunction with the Q-20 to make a multiple flash setup that's both
simple to use and inexpensive.)
You can use the 1/4-20 socket on the bottom of the Q20 to
mount it on a tripod, or just use it's nice, flat bottom to sit the Q20
on a table or anywhere it's convenient. (There is a 1/4-20
tripod socket on the cold shoe of the receiver of the T1/T1s FlashQ
wireless triggers, as well.) Anywhere up to 30
feet (10 meters) from the camera will do.
The
Optical Slave system:
You can also use the Q-20 with remote optical triggering such as used
by Olympus, among others. The Q-20 has two modes for this, so
that the Q20 can work with both regular and the newer, more expensive,
TTL flash units. These are selected via the S1/S2/Modeling button.
After the first press on the button the Q20 is in the S1 mode (red led)
& the FlashQ Q20 synchronizes
to the single flash of a non-TTL flash, just as you'd expect.
TTL flash units fire two flashes, in rapid succession ... the
first allows the camera to
measure the light received on the sensor and (to a lesser degree, help
prevent red-eye by causing your subject's iris
to close down) and a second flash to acutally
make the exposure. In S2 (green LED) mode, the Q20
ignores the pre-flash and sychronizes to the second, or main flash.
If
you press the small button again, the LED turns blue and turns
on
the modeling light. (See
above.)
Press the button one last time and the LED goes out, indicating
"normal" operation.
|
 |
Performance:
With a guide number of 20 (meters) or 65 (in feet) , at ISO 100, the
diminuative Q20
has more than enough power for most uses.
Especially in this age of cameras with really good
performance at higher ISO settings. I seldom shoot my Oly
OM-D E-M1 Mk II at less than 400 ISO. This means an effective
GN of 40 (meters) or 130 (in feet).
My own tests confirm that the Q20
will deliver
approx. 100 flashes with a fresh pair
of alkalines, with a starting recycle time is about 6 seconds.
Natrually, this time will extend, as the batteries become depleted.
Recharging times with NiMH rechargable batteries
are claimed to be a wee bit
faster, due to their lower internal impedence, but in my own
experience, they are about the same.
Minor Quibbles:
I've had the FlashQ Q20 for
about 3 weeks now, and I'm having a hard time finding anything to
quibble about. I had worried, at first, that the removable
shoe/sender would somehow be a weak spot (after all, there is a booming
cottage industry building replacement feet for my old 283!),
but, in use, the two steel clamps that grip the sender are remarkably
sturdy, providing a rock
solid connection. Better yet, they also act as contacts,
direct to the camera's hot shoe, so when you're using the Q20 as
a normal, on-camera flash, there is no need to turn the
trigger in the shoe on, nor do you have to sync the flash with it. It
works just like you'd expect it to. Pop it on, power it
up and shoot!
 |
If
there is a quibble, it would be the CR2032 Lithium batteries in the
shoe/sender and the remote.
These batteries are long lasting, but the
sender does draw a tiny bit of power, even when off, so it can
sense when the power button is pressed & held, to turn it on.
Thus, the life of the battery is about a half year. Because
of this, LightPix Labs recommend removing them (it's easy to do!)
if the units
are not going to be used for a while. Outside the units they
should last a decade or more. The batteries are not expensive, nor
are they large or heavy, so I'd simply you be sure to have a spare or
two in your bag, just in case.
The other quibble would be that the recycle time gets longer, rather
quickly. This is due to the use of just two AA cells. But, to use four
would have made the unit much larger. Everything in this
world is a compromise and I'd far rather have the smaller, lighter Q20
and carry a spare set of AA batteries, rather than lug around my old
283.
Of
course, if you are using low (1/32nd or 1/64th) power, the
recycle time is almost instantaneous no matter how worn your batteries
are!
When you press the "test flash"
button, the flash does not fire until you take your finger off
the
button. This seems counter-intuitive, but you soon get used to it.
Just an oddity.
|
Oh,
and it would be nice if the English language owner's manual (well,
OK, the owners sheet of paper) had a more detailed explanation of the
S1 & S2
modes.
Conclusion:
For
the hard-working pro, this flash is not going to "cut the mustard".
It's too light on accessories (diffuser snoot, etc.), not
powerful enough and too short on battery power. But, then,
the Q20 is not intended for pros.
Because you have
to set the f-stop, it could be a problem for some neophytes, but that's
easy to learn and, becasue it's not a TTL flash, it works with any
hot-shoe camera ... Nikon, Canon, Olympus, Pentax, Sony and, well, just
about everything, film or digital!
However, for all but the most advanced amateurs the FlashQ Q20 provdes a
powerful, compact, lightweight, easy to use electronic flash, that
offers almost every feature that you'll ever really need, at a
remarkably
low (US$ 89 + s&h) cost.
It's compact size makes it ideal for use with smaller (mFT
& APSC) cameras
and it fits in a shirt pocket, so it's perfect for air travel!
Will it prove to be a workhorse? I don't know... ask
me in 10
years. But, every indication is that it will be.
It's solidly made, nicely finished and beautifully
engineered.
If
you want a versatile, reliable, compact flash, without
breaking
the bank; you'll be hard pressed to do better than LightPix Lab's
FlashQ Q20.
----------------------------------------------
Where to get one:
You can
order your Q20 from:
B&H Photo (USA)
robertscamera.com
(USA)
lightpixlabs.com
(elsewhere)
-----------------------
You
can order the
FlashQ T1/T1-s Wireless Triggers from:
robertscamera.com (USA)
cameratools.nl
(Netherlands)
lightpixlabs.com
(elsewhere)
LightLPix Labs keep a
list of up-to-date list of distributors/resellers on their
webste: LightPixLabs.
If you need more information, contact them
directly at: info@lightpixlabs.com
---------------------------------------------------------------------------------------------------
*
IMPORTANT NOTE:
As I
said, you can use your Flash Q triggers with ALMOST any flash.
If
you have a "vintage" flash (more than, say, 15-20 years old)
it may have 200 volt, or more, on it's
contacts. Older, film
cameras had mechanical contacts that could handle that much voltage.
But modern digital cameras can handle only 5 to 12 volts...
so
using an older, high
voltage flash with a digital camera can (and most likely will) fry it. And
once smoke comes out of your camera, it's almost impossible to
stuff it back
in!
If you're not sure, charge your flash and use a volt-meter to
measure the voltage on the two terminals of the flash's hot shoe or at
the PC cord.
As an example, this little, 30 year old, ARGUS flash still works
perfectly, but shows a smoking 239.2
volts at the flash terminals!
If you have one of these relics, you can purchase "Safe Sync"
adapters that
isolate the high trigger voltage of the old flash from your
camera. Better
yet, treat yourself to a new FlashQ Q20 and get a lot more,
for not a lot more!!
(While
the FlashQ T1/T1-s receivers are self-protected up to 300 Volts, they
are not
recommended for use with older, high voltage flash units.)
|
 |
| If
you found this, or any of my reviews, helpful, please consider
supporting this effort by purchasing my e-book, "A Brief History of
Photography", It is, by
far, the most complete, up-to-date, history of photography, anywhere and should be required reading for every
photographer.
"A Brief History of Photography"
is just what it says it is. Fast paced and easy to read, yet it covers the history from 1614 right through to early 2020. Spanning the equivalent of 450 printed pages, it covers not only the chemistry, but the seminal cameras, films,
sensors, lenses and accessories of their day; along with their
companies and their inventors.
It includes hundeds of "trivia" entries - which offer little-known background stories on both
the inventors & their inventions.
Profusely illustrated.
To learn more, click on the book, at the right.
You can also read it on just about any platform via free apps from
Kobo.com

|
 |
If
you've
found this review helpful, you might enjoy some of my other reviews,
found here.
You might also
enjoy
my wildlife
photos,
all taken with Leica or Olympus glass.
If
interested, you
can
also find my antique Debrie
Sept
and 1950 Beauty
Six (one
of only two
known
to exist in the
world)
at Camer-Wiki.org.
Thanks
for reading.
Last
updated: 12 November, 2018
Disclaimer:
LightPix Labs provided
me with the Q20 and a set of T1 triggers for this review.
I have no other connection with LightPix Labs, or with any of their
distributors.
I do not make any money if people buy the units.
The opinions expressed here are truthful and solely my own.
|
|