
First look at the
Olympus E-M1
Firmware 4.0
Tested with a variety of mFT and original Four-thirds lenses.
Olympus E-M1
Firmware 4.0
Tested with a variety of mFT and original Four-thirds lenses.
Like many, I have awaited the latest firmware upgrade with bated breath. Is it worth the time and trouble to upgrade? ABSOLUTELY! Lets take a look at the new features, in order of their importance to the still photographer.
Viewfinder improvements.
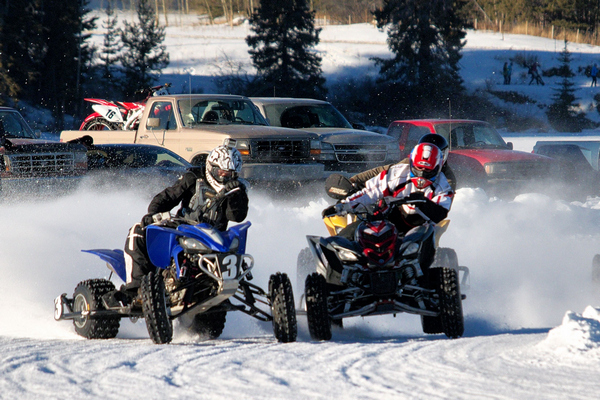
From the very beginning, Olympus has sold the E-M1 as not only their flagship model, but as a sports camera. While the first was true, the latter was a bit of a stretch. At first, the Auto-focus, though extremely fast & accurate, simply wasn't good enough to track fast-moving subjects. But, that was much improved with firmware 3.0 and improved a wee bit more in 3.1. To be honest, as this is written I have not had the chance to check if v4.0 is a wee bit improved, again. If it is, great. If not, it's still pretty good.
 |
I
won't really get a chance to test firmware 4.0's tracking until
late January, when the crazies who race motorcycles and "quads"
(ATV's) across our frozen lakes, at -20C, start racing
again. Racing season lasts only a few weekends, in January
and February, so watch for an update to this review shortly after the
season starts, on Jan. 17th, 2016. UPDATE:
The entire Ice Racing season has been cancelled due to warm
weather and poor ice. (It has been unseasonabley warm, here.) Thus
testing the 4.0 tracking improvements (if any) will now have to wait
until Rodeo season, which starts in May. May 23/2016: I have now done one rodeo with the E-M1 with Firmware 4.0. So far, I can see no significant improvment in the tracking. But, for sports, the big bugaboo was the eVF. Now, don't get me wrong. I love the eVF in the E-M1. I love the abililty to check the exposure compensation, before I press the shutter release, and I find the clarity just fine. But, when shooting in high speed (say 9fps) the eVF flickered, much in the way that a dSLR would flicker, as the mirror flipped up and down. (The eVF was actually taking a break, while the photo was written to the buffer.) That was OK ... not much different than a dSRL. But as the buffer filled (especially when shooting RAW) the blackouts would get longer and longer, as the camera struggled to write to the card. Eventually, it simply went black. |
It seems not to matter whether I am in SOV mode (no exposure compensation visible) or standard eVF mode (with exposure compensation visible); using mFT lenses or the older Four-Thirds lenses... the viewfinder is now bright, clear and virtuallty uninterrupted !!!
The E-M1 is now a sports photographer's dream! With a high-speed U1 card, I can get 37 raw shots, before the buffer fills. Then, the speed drops, as you'd expect, but the view is never lost! In fact, it is interruped less than it would be in a top-line dSLR, by its rapid-return mirror. Some jumpiness does show, during high speed shooting, if you pan the camera. It is not quite as smooth as when simply looking through the finder, moving the camera around to compose your shot. But it is a small price to pay, for such an improved level of performance.
Since there is no hardware upgrade (a faster processor or "engine" has not been installed), I suspect they have achieved this much appreciated improvement by hand optimizing the code from the compiler with which they wrote the firmware. This is skillful, but mind-numbing, tedious work. But it will speed up a computer program many fold. So, to the guys & gals in the back room, who did such a wonderful job ... Thank You! My hat is off to you!
The SOV (Simulated Optical Viewfinder) is a bit of a let-down. It is more like the optical viewfinder in a dSLR or even a rangefinder camera, in that it shows a constant brightness image, that does not show the changes in exposure over-rides, something that I have found a huge advantage over the standard dSLR. (My early expectations were that Olympus had forgone the exposure compensations to get the non-blackout viewfinder and I'd have been good with that compromise. But, this has proved not to be the case. The SOV mode does offer better dynamic range, in the image and is very close to an optical viewfinder, but I'm still not sure if that's enough to make up for the loss of the ability to preview the exposure compensation, etc.
Silent Shooting.
This is not something that you will often need. But, for shooting in a theatre, museum, ossuary , or any place where even a small noise would be a distraction, it's perfect. They achieve this by locking the shutter open and scanning the sensor, line by line.. This is, essentially, the system used by all point-and-shoot cameras, except they have no mechanical shutter to lock open!
It also has the advantage of not being limited by the mechanical movement of the shutter. So, a top speed of 1/16,000th is now available to you. For reasons known only to Olympus, in Silend Mode the ISO tops out at 3,200 rather than the 25,600 available with the mechanical shutter. I'm not sure that this is a serious drawback..
However, "There is no free lunch ", as the old saying goes. So, what's the catch?
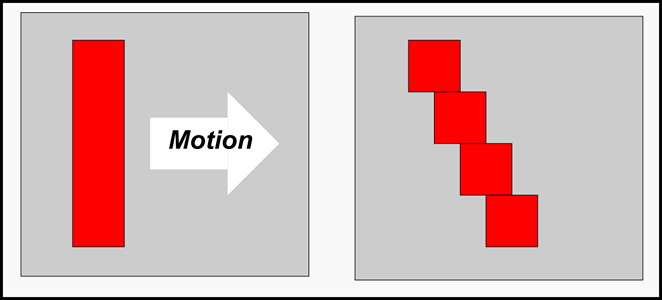
With a "rolling shutter" (the type found in virtually all digital cameras) the rows of photosites are read out, one by one, from top to bottom. Thus, even at electronic speeds, it takes a finite amount of time to get from top to bottom. Lets assume that we are shooting a red painted post, mounted vertically on a fast moving truck. As a photo is taken of the post, as it roars by, the sensor scans the scene, from top to bottom. Each row finds the moving post in a slightly different spot, in relation to the rows scanned above. So, the post begins to acquire a "lean"., as shown in the diagram on the left.
|
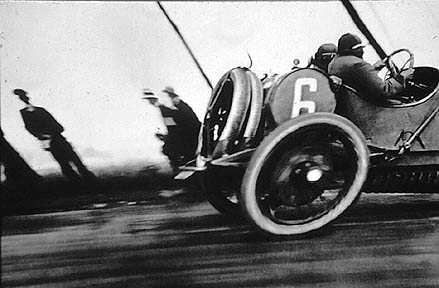 |
Back in the early days of photography, this effect was found in the larger, slower focal plane shutters, as evidenced by the photo on the right, taken on the 26th of January 1912 by Jacques Henri Lartigue. The combination of the vertical-run, focal plane shutter and the left-to-right motion of the automobile created the lean. Because he panned the camera, trying to get the car pin-sharp, the people and poles in the background have the opposite lean.
With both film and digital "rolling shutters", the effect is, essentially, the same. With slow moving and stationary subjects, there is no noticeable effect. But a "lean" can show with fast moving objects. It is also the reason that digital cameras still have mechanical shutters. They "lock" or freeze the image, until the sensor can be read, eliminating the "lean".
There is, in development by several firms, including Olympus, sensors that will have what's known as a "global shutter". Such a sensor will "lock" all the photosites until they can be read, thus ensuring lean-free images of rapidly moving objects. Rumour has it that such a shutter will be installed in the E-M1 Mk II, said to be coming in 2016. If true, there may be no longer any need for mechanical shutters, which should improve the life of a camera, for it is usually the shutter that wears out first. For long time camera users, like myself, this may be a hard thing to accept!
Without the "mirror slap" of a dSLR, the E-M1 is quite a quiet camera to start with. But the Silent Shutter makes it perfect for plays, shows and anywhere were the sound of your camera might be intrusive. And, remember, eliminating the need to wait for the mechanical shutter to reset, means that the upper limit can (and has) been raised from 9 fps (with full AF) to 11 fps - still with full AF!
Focus Stacking. Focus stacking has come into vogue, in the last few years. It was something not really possible before the digital age. The theory is simple.
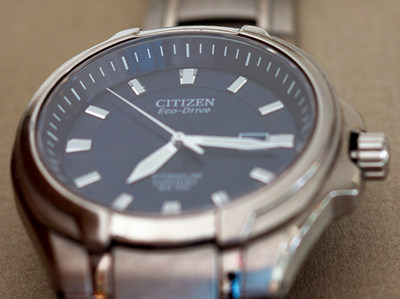
| Take
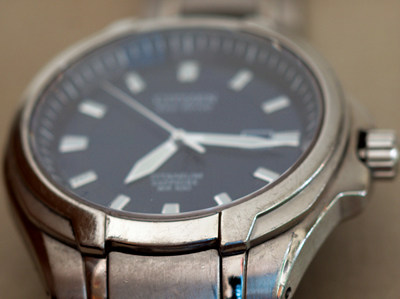
a look at the four shots at the right. The top left one is
focused on the far edge of the dial. The top right shot is
focused at the near edge (bottom) of the dial. At such close
range, it is impossible for any camera (other than a view camera with full movements)
to get it all in focus....even at
f
22.
So, instead we take a number of shots, each focused on different parts of the subject. As you can see in the lower left shot, I used 8 images - the red lines show where each shot was focused. The last shot, lower right, shows them all blended together, to make a final shot, entirely in focus. Until now, this would have been done in separate software, and take multiple steps - as was done at the right. It was not for everyone. |
 |
 |
| The
series to the right was made with my E-M1 and firmware 3.0. These
images were blended using a freeware package called Combine-ZP, but you
can use any number of free and paid-for packages. (Just Google "Focus Stacking Software")
With Olympus' new Focus Stacking feature, you can set up your camera (a tripod is preferred) and set the distance between shots, called the focus differential - an arbitrary number from 1 to 10. Focus on the nearest part of your subject and press the button. If your camera is set to RAW, as mine always is, the camera will automagically switch to RAW+Jpeg and shoot 8 shots slightlly adjusting the focus point with each shot. It will save both formats for you, and will then convert the 8 jpegs into one, combined jpeg. |
 |
 |
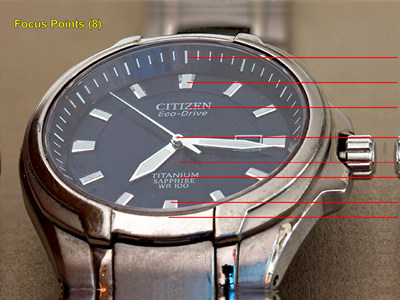
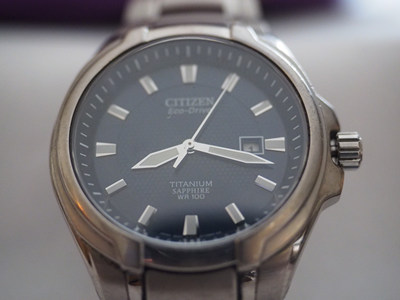
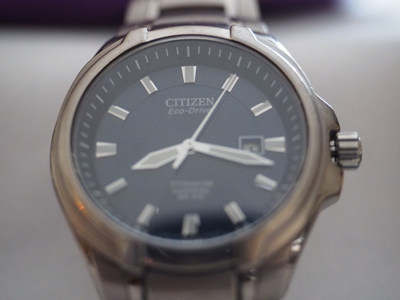
The series below was taken of the same watch, but using the Focus Stacking feature of Firmware 4.0. The camera automatically switches to Silent mode and to high-speed, making it possible to do focus stacking hand held, if you are quite steady. I experimented with several series hand held, with mostly satisfactory results. (If you get too sloppy, the camera will simply fail to make the combined jpeg, and you'll have to try again.) But the images below were made using a small, Manfrotto table tripod and results were much crisper, as you'd expect. You can see the focus point change, from bottom, to middle, to top; as the series progresses, left to right.
 |
 |
 |
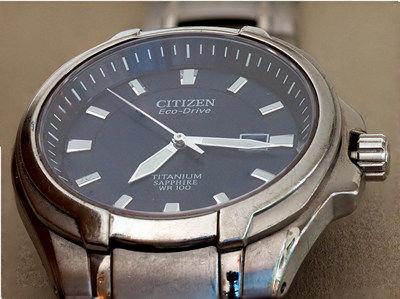
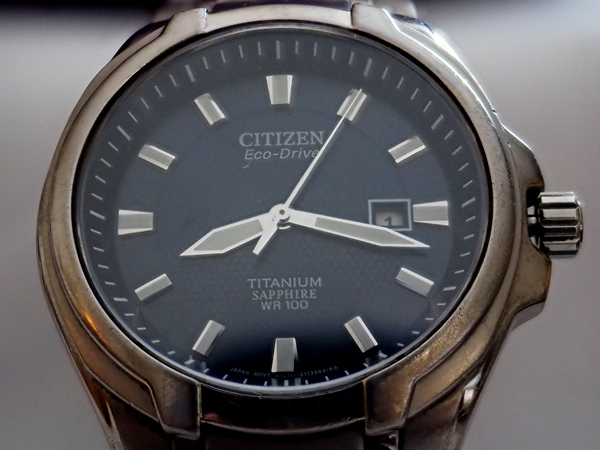
| The
combined jpeg, straight from the E-M1, is at the right. The camera
eVF and/or rear screen goes black and a "busy-bar" is displayed
while the camera does it's work. All done in about 10 seconds. A little experimentation with the "focus differential" setting may be needed to get the best balance. This series was made with the "focus differential" of 10. Five did not give enough range, all the way to the top. Settings 7 or 8 would likely have been perfect. But I was short on time. Using a setting of 10 resulted in sharp focus beyond the top of the dial, but as changing the focus causes slight changes in image size, Olympus blends the images and then crops them a wee bit, as you can see. (All images shown are full frame shots, without cropping - straight from the camera.) Focus Bracketing: If you are doing something rather bigger and need more shots to cover the distance, you can use Focus Bracketing. It works much the same way as Focus Stacking, except that you will have to do your own combining, outside the camera. In the same menu that you set focus stacking, choose the number of shots you wish (up to 99!) and the focus differential. (Here you will need a tripod, as the risk of moving the camera while such a large number of shots are taken, is very real.) Some experimentation will be in order, to find the right differential for any given subject. With digital, this is a zero cost option, other than your time. As with focus stacking, the camera will automagically change to silent mode, RAW+Jpeg (if required) and high speed shooting, |
 |
Focus your first shot on the nearest part of your subject, press the shutter button all the way down and then release it. The camera will take the first shot, where it was focused by you, and continue to shoot until either [a] the required number of shots have been taken, or [b] infinity focus is reached.
This can be done in Jpeg or RAW. If in RAW, you'll have to develop them, and then combine them with some sort of external software, such as Photoshop, Combine ZP, Helicon Focus, Zerent, Hugin (with enfuse) and others. Some are free, others requre money. The choice is yours. Just remember that the higher cost options are not necesarilyl the better ones! Focus Bracketing will allow you to do much more ambtitious projects with remarkable ease. For simpler things, use Focus Stacking, right in the camera! It is remarkably good!
Smooth Apeture Support: For the 30+ years that I shot with Leica, before switching back to Olympus (I took an Oly OM-1 to the USSR in 1975), my favourite lens, above all, was the 90mm f 2 Summicron. Outside the 50mm Summicron, few lenses could match it for fine detail, sharpness and contrast. At any price.
The mFT Zuiko PRO and Premium series of lenses are good - very good indeed. But even they seem unable to match the image quality of f the Summicrons. But the 75mm f 1.8 Zuiko is the execption. In every aspect, it is the equal of the Summicrons. Well built, incredibly sharp, with the added advantages of small size and relatively light weight. Some might say "brighter" or "faster", too, at f 1.8 rather than f 2. But, to be fair, a 1/3 stop improvement is rarely, if ever, going to make a practical difference. Except, possibly, to reduce the Depth of Field, so your subject stand out from the background. But, even here, 1/3 stop will make only a very minor difference.
But, all was not perfect in the land of Zuiko. Just moving the camera around, when turned on, would cause the lens to emit a "clicking" sound, as the aperture changed. This did not affect stills photography in any important way, but was most annoying. A piece of top-quality gear, of any brand, simply should not do that! More importantly, this sound was picked up by the built-in microphones and was reproduced in videos shot with the lens (and other Premium series lenses, I'm told) when recording. Not good!
But now, to the delight of picky people like myself ... and videographers everywhere... the Premium Series lenses (and the 14-42 Zuiko EZ) are quiet, as all good lenses should be. Much better!
Focus Peaking: There is not a lot to say, here. Focus peaking works as before, But, to be honest, I found both the white and black outlines rather hard to use, and thus did not use the feature very often - sometimes to my own peril. But I find the red highly visible, which makes the feature much more useable. You, of course, may prefer the yellow. No matter which colour you prefer, it is now a feature that is much easier to use. My test for manual focusing is an old 55mm f 1.2 Canon lens... wide open, it has very little depth of field and can be quite difficult to manually focus on the E-M1, but with focus peaking in red, it's a delight !
Home Point Setting: I have FN1 set up on my camera to allow me to set a custom focus point for certain shots. And I have Fn2 set to reset the focus area to the "home point" - in my case the center of the screen. Thus, when shooting sports, I can set it for a special shot, and then simply press the Fn2 button to reset it. With firmware 4.0, they have made this function a "toggle". When you have an odd focus point set, simply press the "home" button and it will reset to the home position - whatever that was set to. But, now, press it again, and it reverts to the custom position. Press again, and we're back to the home spot! This makes things really convenient - especially for sports photography.
Video: There have been a number of improvements to the video functions of the camera. And I'm sure they are all quite good. However, I do not shoot video, at all, and am not the person to evaluate just how good the improvements are - or not. Sadly, you'll have to find another reviewer for those aspects of the upgrades. Similarly, I have not examined OI Share and Olympus Capture, as I do not use such software... though I may upgrade this review later, to include them.
One (major) Caveat: I don't know why Olympus' updates system has to do this, but firmware update v4.0 resets every custom settting you have back to the factory defaults. Having to put things back to the way you like them is a pain int the patoot. But, other than time, it's not a big deal. Except for one.
Firmware Update v4.0 resets your image numbers back to 0001. For me, it is not a problem, as I save all my images by date. I will create a directory called 15.12.01 (YY.MM.DD) and I use a neat bit of free software called Stamp V2.8, which renames your files, but does not otherwise alter them. (By starting a new directory, every month, I can shoot 10,000 photos per month without duplicating file names. If I am on assignment, and expecting to shoot many photos in a day, I'll simply start a new directory, called, for example, 15.12.14 and put my files there. I'll often append the directory name, so it reads 15.12.14.HVC, if I was shooting, say, at the Highland Valley Copper mine. It simply helps me find the images faster, later.)
I transfer my .ORF files from my card to a temporary file called "Buffer", using Adobe's free DNG Converter and changing them to .DNG files along the way,. To transfer them to my final directory I use another excellent piece of free software: Stamp, v2.8; which I use to automatically add the YY.MM information, but keep my image's original serial number. So my raw files are numbered YY.MM.xxxx. All I have to do is to start a new directory and put the images there. Problem solved.
(If this is clear as mud, see my wildlife & documentary photos here. The image numbers are shown in the bottom right of each image.)
However, if you save your images without altering the file names, in either .ORF or .JPG forms, then you need, at a minimum, to save them to a new directory, after the upgrade., in order to avoid duplicate file names and the risk of a newer file overwriting an earlier one of the same name.
Another solution is to change the filename prefix using the file prefix. To do this use the "Custom Menu H / Edit Filename" function, so that new photos have a different filename prefix than your ealier ones. This, too, will prevent overwriting. (Be sure to change both the sRBG and Adobe RBG options.)
Dennis Mook suggests a work-around for this problem. He suggests you copy the last image taken prior to the upgrade onto a recently formatted card and put it into your camera, immediately after doing the upgrade, and before you turn the camera on. The camera should then automatically start with the number after that one. This seems reasonable, but I have not tried it. For more on this method, see his blog.
Conclusion: I bought my E-M1 right at the beginning .... and I've watched it improve from a very good camera, to a remarkable camera. As I get older (now 50+ years behind the lens) I want something smaller, lighter and easier to carry than a full-fledged, full-frame dSLR. But, as a working pro, I also demand top performance and super reliability from my gear. I do both wildlife and documentary photography and the results have to satisfy both myself and my clients. The E-M1 fills the bill, perfectly. If I could ask for anything more, it would be better focus tracking of moving subjects. Here the Olympus is not quite up to the level of brands N & C... yet. But they're getting close, I can't help feeling that one more firmware update would do it. I hope we get it!
Suffice it to say that the EM-1, with firmware 4.0, is now as close to perfection as I could reasonably want. When the Olympus E-M1 Mk II comes out (rumoured to be late 2016) I'll be in line for one of the first, with my present EM-1 becoming the backup camera. There is no way I'll part with it!
If you have an E-M1, don't hesitate to upgrade to 4.0. You won't regret it!
If you found this, or any of my reviews, helpful, please consider supporting this effort by purchasing one of my e-books for just US$ 6.99. There are now many satisfied readers of these books in the UK, Canada, Finland, Lebanon, Australia and the USA. The Brief History of Photography consistenly gets 5 stars out of 5 in reader reviews!
Thanks for Reading.
 |
 |
 |
 |
|
These e-books are based on a series of courses that David has taught in the USA, Germany and, of course, Canada, for many years. David has been behind a camera for over 50 years, capturing images in some 29 countries. With a little paitence, and his wealth of knowledge, you can readily move from being a taker of snap-shots to a maker of super-shots. Available as inexpensive e-books for almost any e-reader (other than a Kindle) as well as your Android or IOS tablet, or desktop computer. Click on any e-book cover, for more information. 
If you've found this review helpful, you might enjoy some of my other equipment reviews, found here. You might also enjoy my wildlife photos, all taken with Leica or Olympus glass. You can find my photo-instruction DVDs here. If interested, you can also find my antique Debrie Sept and 1950 Beauty Six (one of only two known to exist in the world) at Camer-Wiki.org. Thanks for reading. Last updated: 4 December, 2015 |